Custom Event and Location Fields
Aside from the usual fields Events Manager offers, you may find the need for extra fields that would contain specific information about your events.
For example, you may host evening events and require a dress code or minimum age. You could be hosting classes and want to include teacher names.
There's two ways to add custom information events and locations, the traditional WordPress way which uses Custom Fields, or using our custom attributes feature.
Custom Attributes vs. WP Custom Post Fields
Custom attributes ARE custom fields. Custom fields with events work the same way as with WordPress post or pages, custom attributes are simply a way of imposing certain restrictions which custom fields do not:
- each attribute can only be used once per event/location
- only attributes created by admins can be used
- a choice of pre-determined values can be provided
Which one to use really depends on your specific needs. If you don't have a preference or you need to force specific fields and nothing more, try custom attributes (enabled by default). You can always go back and forth using custom fields, because the data is stored in the same place.
Enabling/Activating
To use event attributes or custom fields you must first enable them in the Settings page.
Events
Go to the Events > Settings page in your admin dashboard and open the General Options panel. You will see these two options, choose which features you'd like to use.
Locations
A little further down from the event attributes are the equivalent options for locations:
Creating Custom Attributes
Now we need to define our attributes by giving them names and possible values. Attributes are defined by either adding them to your attributes box in the same settings page where you activated attributes above, or entering them directly into your formats on the settings page. Events Manager will detect that there is a new attribute and generate the right form fields on the event or location registration page.
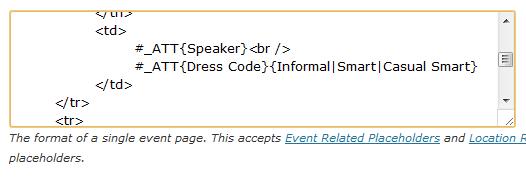
In this example, I want to show the name of the speaker at my event, and the dress code. Speaker is the name of my speaker Key, this is what will as the label name for entering Speaker information on the event registration forms. I will also add a Dress Code attribute with some pre-defined values.

The syntax used to create attributes is as follows.
#_ATT\{Field Label}- Text event attribute, no default value if not defined.#_ATT\{Field Label}\{Default Value}- Text event attribute, with a default value if not defined.#_ATT\{Field Label}\{Default Option|Option 1|Option 2|etc.}- Select from one of the options, seperated by a pipe | character. If not defined, the first option is considered the default option.
So, using the earlier example, this is what we would see in our event registration page:
Location Attributes
Location attributes work exactly the same way as Event attributes, with some slight differences:
- They have a different placeholder, instead of #_ATT use #_LATT.
- They can be used on event and location formats alike.
- There is a seperate location attributes box if you're not adding your attribute directly into a format.
Managing default values and preset values in attributes
As you can see in the attribute examples above, the second page has a select box, which shows the options that were seperated by the | character. This makes things really easy for the people registering their events and also prevents misspellings or unwanted values from being entered.
If I have the same attribute in multiple places and need to add one more option, where do I add it?
This will undoubtedly be a common question, and fortunately there's an easy solution. In the first screenshot, you'll see a text box for event attributes. Using the example above, we could just use #_ATT\{Dress Code} throughout the formats and add #_ATT\{Dress Code}\{Informal|Smart|Casual Smart} to that text box and it will apply to all the other attributes with the same name.
What about old attributes that I would like to add preset values to?
That is not a problem, but bear in mind that when converting an old attribute, if your event attribute values don't appear in the list of options, the default option will be used for that event.
Creating Custom Fields
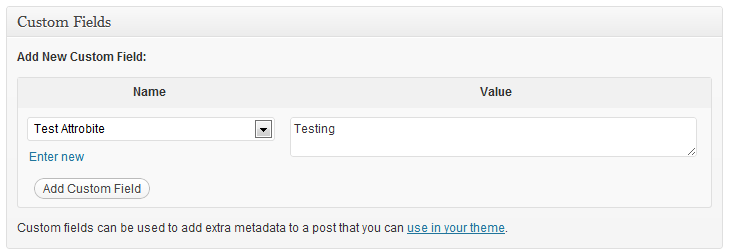
If you decide to use custom fields, you'll see a section in your event/location submission forms similar to this:

You'll be able to assign previous field keys and new values, add new custom fields with a new field key, or add a field more than once.
Displaying Custom Fields and Attributes
The easiest way to display custom fields and attributes is using the #_ATT and #_LATT placeholders for events and locations respectively. In our example above for creating an event attribute, the #_ATT placeholder was used to output Speaker and Dress Code information. If this was a custom field with the same key name, it would have been displayed instead.
Since attributes are custom fields, you can also retrieve field and attribute values as custom fields using WordPress custom field functions within your theme files.