Xero
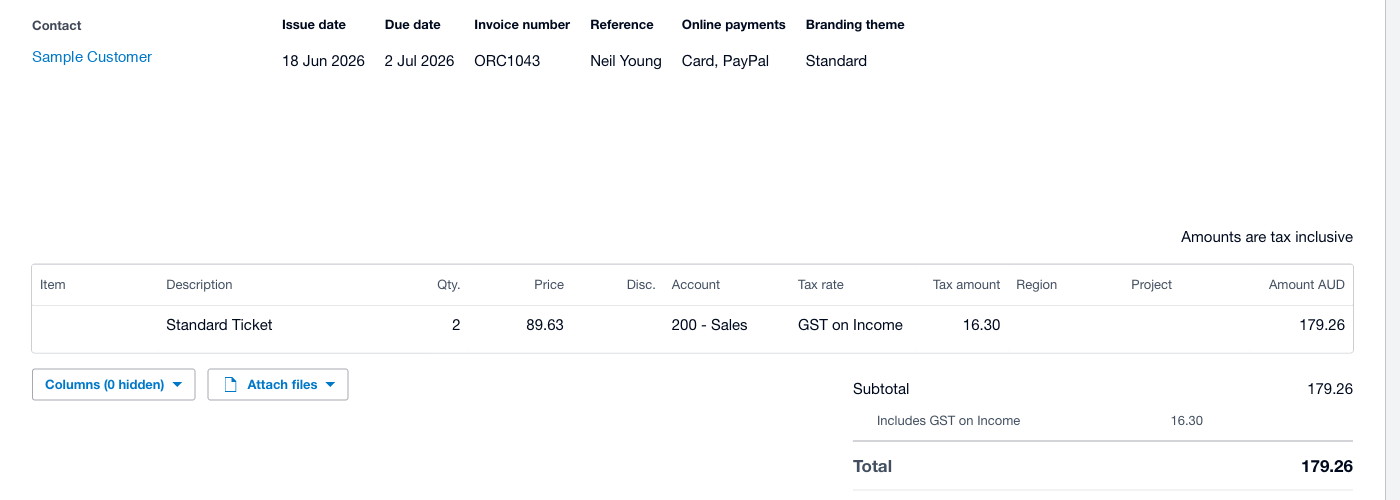
The Events Manager Pro – Xero add-on turns a booking into a proper Xero invoice. When someone books a paid event, the add-on creates an authorised invoice in your connected Xero organisation and then either sends the customer to Xero's hosted payment page or emails them the invoice to pay from their inbox — your choice. When the invoice is paid, Xero notifies your site automatically and the booking is confirmed.
This guide walks you through connecting your site to Xero and raising your first invoice. There's no code involved.
- Events Manager Pro installed and activated (the Xero add-on requires it).
- A Xero account you can sign in to. The same login works at developer.xero.com, where you'll register a free app.
- A few minutes.
How it works
- A customer books a paid event and chooses Pay via Xero Invoice at checkout.
- Your site creates an invoice in Xero for that booking.
- Depending on your settings, the customer is either redirected to Xero's online invoice to pay by card, or emailed the invoice to pay later.
- When the invoice is paid, Xero sends your site a secure webhook and the booking is automatically marked as confirmed.
You connect to Xero once, using a free "app" you register in Xero's developer portal. That app is what lets your website talk to your Xero organisation securely — let's set it up.
1. Create a Xero app
Your website connects to Xero through an OAuth 2.0 app that you register once. This is free.
Sign in at developer.xero.com, go to My Apps, and click New app.

Fill in the form:
- App name — anything that identifies your site, e.g. "My Events Website". Your customers will see this name on the Xero consent screen.
- Integration type — choose Web app.
- Company or application URL — your website address.
- Redirect URI — this is the one value you need to copy from your site. Open your gateway settings (see Step 2), copy the Redirect URI shown on the Xero Connection tab, and paste it here.

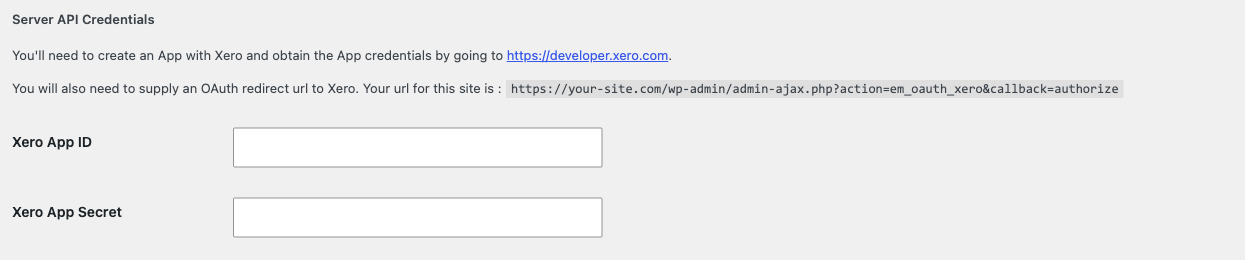
Once the app is created, open its Configuration page. Here you'll find your Client id and a button to Generate a secret. You'll copy both into your website in the next step.

Your Client Secret is shown only once and works like a password — don't share it or post it anywhere public. If you ever lose it, just generate a new one.
2. Connect your site to Xero
In your WordPress admin, go to Events → Payment Gateways and click Xero Invoice to open its settings. You'll land on the Xero Connection tab.
- Copy the Redirect URI shown here into your Xero app (Step 1) if you haven't already.
- Paste your Client ID and Client Secret from Xero into the matching fields.
- Click Save Changes.
- Click Connect to Xero. You'll be taken to Xero to approve the connection — pick the organisation you want to use and click Allow.
After you approve, you're returned to the Xero Connection tab, which now shows you're connected.

For your security, the secret is never displayed back to you. Once saved, the field shows a placeholder — leave it blank when saving again to keep your existing secret.
3. Set up the webhook
The webhook is how Xero instantly tells your site when an invoice has been paid, so bookings are confirmed without you lifting a finger.
On the same Xero Connection tab you'll find a Webhook section with a Delivery URL and a Webhook signing key field.
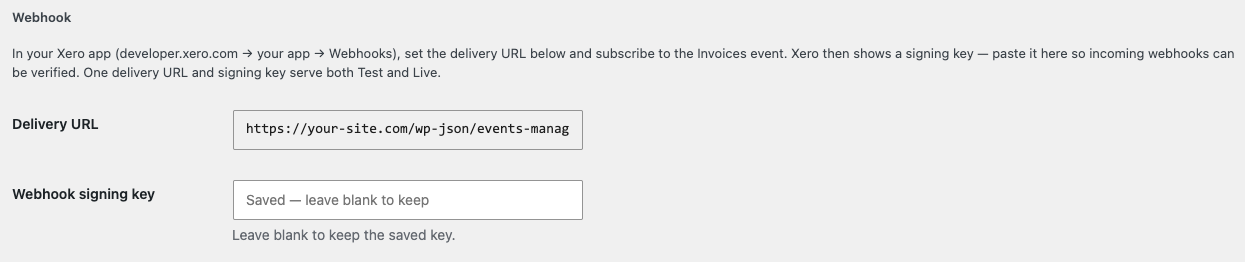
- In Xero's developer portal, open your app and go to Webhooks.
- Set the Delivery URL to the one shown on your site, and subscribe to the Invoices event.
- Xero will show you a signing key — copy it, paste it into the Webhook signing key field on your site, and click Save Changes.
One delivery URL and signing key cover both Test and Live — you only set this up once.
4. Choose your organisation and account code
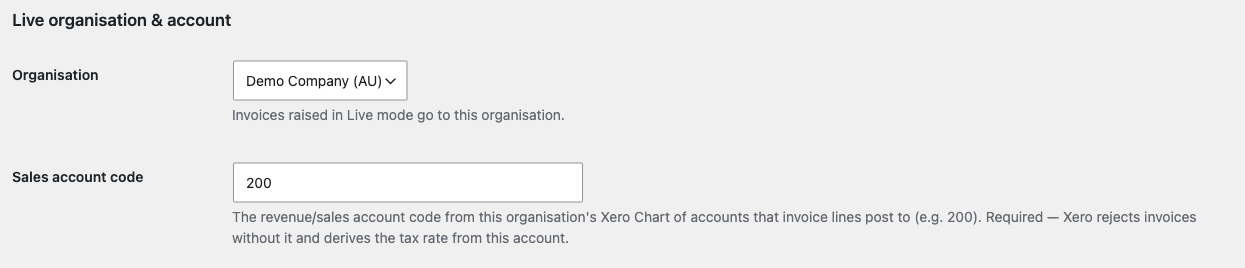
Xero has separate Test and Live modes, shown as the [Live] and [Test] tabs. Each mode points at a connected Xero organisation, so you can safely trial everything against Xero's free Demo Company before going live.
On the [Live] tab, choose the organisation invoices should go to in live mode, and enter your Sales account code — the revenue account from your Xero Chart of Accounts that invoice lines post to (for example 200).
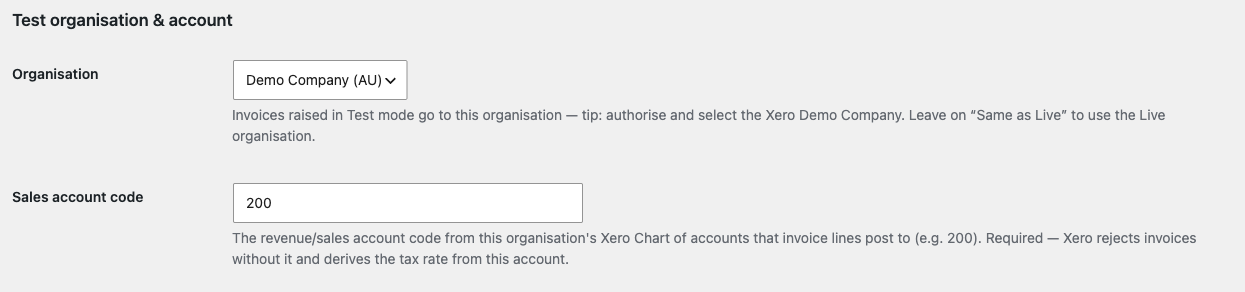
On the [Test] tab, do the same for testing. A great choice here is Xero's Demo Company. You can also restrict test mode to specific people or IP addresses using the standard Limited Test Mode options.
Xero works out the tax on each invoice from the account code you choose, so make sure your Events Manager tax rate matches the tax rate set on that Xero account. The invoice total always matches the booking total — but if the rates differ, the net/tax breakdown will follow Xero's account. Keep them in sync to avoid confusion.
5. Gateway options
The Gateway Options tab has a few useful settings:
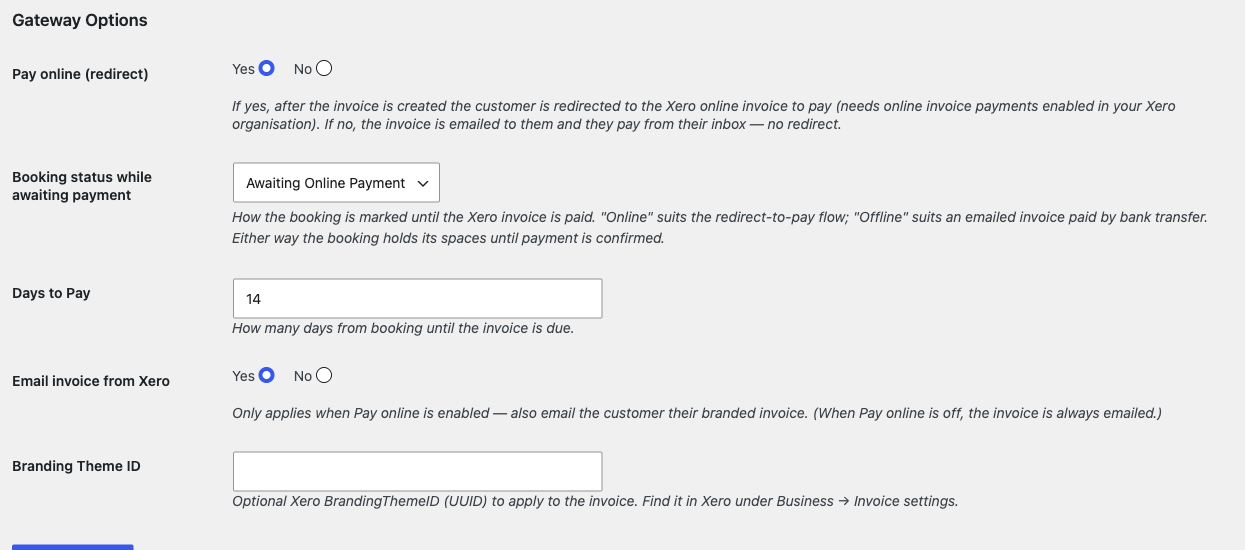
- Pay online (redirect) — Yes sends the customer to Xero's hosted invoice to pay immediately; No simply emails them the invoice to pay from their inbox.
- Booking status while awaiting payment — whether unpaid bookings sit as Awaiting Online Payment (best for the pay-now flow) or Awaiting Payment (best for an emailed, pay-later invoice). Either way the space is held until payment is confirmed.
- Days to Pay — how many days until the invoice is due.
- Email invoice from Xero — when redirecting to pay online, you can also email the customer their branded invoice.
- Branding Theme ID — optionally apply a specific Xero branding theme to invoices.
6. Activate and make a test booking
Finally, go back to Events → Payment Gateways and activate the Xero Invoice gateway (hover over it to find the Activate link).
We always recommend a test run first:
- Make sure you're in Test mode and that your Test tab points at the Demo Company.
- Book a paid event on your site and choose Pay via Xero Invoice.
- Check that the invoice appears in your Xero Demo Company, pay it (or mark it as paid in Xero), and confirm the booking flips to Confirmed on your site automatically.
Once you're happy, switch the gateway to Live mode and you're ready to take real bookings.
Troubleshooting
- "Not connected" notice — open the Xero Connection tab and click Connect to Xero. If you've just changed your Client ID or Secret, save first, then connect.
- The customer wasn't redirected to pay — the online-payment redirect needs your Xero organisation to have online invoice payments enabled. Xero's Demo Company and trial organisations don't return an online-payment link, so during testing the invoice is emailed instead. This is a Xero limitation, not a fault on your site.
- Bookings aren't being marked as paid — double-check that the webhook Delivery URL and signing key in Xero match your site, and that you subscribed to the Invoices event.
- The invoice tax looks different from the booking ��— see the tax note above, and align your Events Manager tax rate with the Xero account's tax rate.
Still stuck? Get in touch with our support team and we'll be happy to help.