Getting Started
This tutorial will point you to some of the important features of Events Manager to get you up and running quickly, easily and with the ability to change your events to suit the look of your site.
Let's begin firstly by installing events manager, if you haven't done so already. Usually everything should go without a hitch, but in case you do run into any issues, there's a few places where you should go to for help:
- Make sure you're on the latest versions of WordPress and Events Manager (and Pro). This may have already been fixed.
- View our Troubleshooting page for common issues. These are regularly updated with recently known issues.
- Visit the WordPress support forums as others may be experiencing the same issues as you. Pro users can also use our member forums which are monitored regularly on a daily basis.
Setting up Events Manager
Once installed and activated, you'll notice a new "Events" menu item within your Wordpress admin area. This contains all the pages concerning your events. The first page you want to visit is Settings, which has all the options for changing the way Events Manager works and looks.
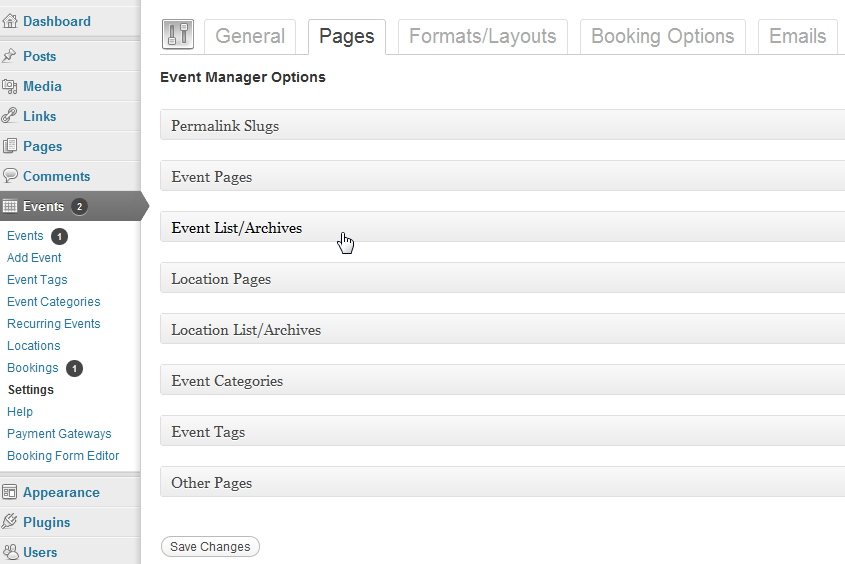
Set Up Pages and Lists
By default, Events Manager will create various pages on your site and overrides the page content with event, location and category lists, as well as a page for previous bookings. EM should automatically create three pages with this structure:
- Events - Contains a list of upcoming events and a search form.
- Categories - Contains a list of event categories.
- Locations - Displays the list of locations on your site.
- My Bookings - Displays a user's booking history and cancellation options.
These pages can be reassigned or disabled from the Pages tab in the Events > Settings page in your admin area.
If you don't see an Events page, verify that there is one in your Pages menu, that the right page is selected in your settings page.
If you do not want pages, you can also allow WordPress to create default archive pages for both Events and Locations, much like posts. You will have the option to enable archives if you select [No Events Page] or [No Locations Page], as well as ordering options.
Overriding Formats
You will notice that for single pages and lists you have an option to override with formats. This means that your settings within the Formats/Templates tab will override the default content output by a custom post type - see Displaying Events further down for more information. By default Events Manager will override with formats to provide more information about events.
Using Pages or Posts?
Since locations and events are custom post types, you can modify the templates used for each type. WordPress assigns custom post types the post template, when often a normal page template would suit it better. If you would like Events Manager to override your default template and treat events like a normal WordPress page, select 'Page' in these cases. Should you wish, you could also create a single-event.php or single-location.php file in your theme and override this feature completely with PHP.
Other Important Settings
Events Manager is set up to pretty much run from get go with no initial setup. However, there may be times where installations didn't go correctly or things aren't working as expected
Creating your First Event
To create your first event, simply go to Events > Add New and start filling out the fields. Note that you may want to set up locations and categories beforehand, although you are able to enter basic location information as you enter events too, or select a previously used location.
Recurring Events
With recurring events, the start date represents the first instance (or the first date a recurrence can start on, depending on recurrence setting) a recurrence can occur, and the end date is the last day an event can occur. So, if you had a weekly recurring event with start and end dates of a month, you would have four events during the selected month.
Bookings
To enable bookings in your event, provided bookings are enabled on the settings page (enabled by default) you should check the enable bookings box and edit/add appropriate tickets. If you are using bookings, you certainly want to view the Booking and Ticketing Options, Booking Email Templates and Email Settings.
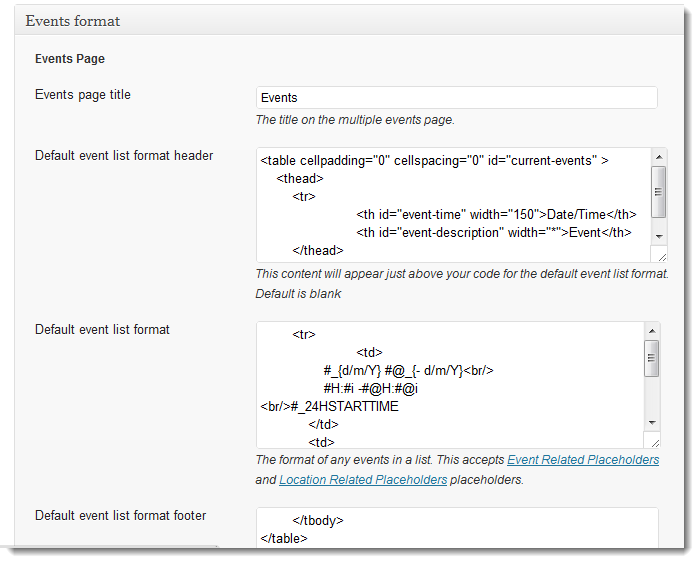
Displaying Events
You'll notice the word "Format" in many options on the settings page. This is the word we use for snippets of html templates for how bits of information about Events Manager should be displayed.
Using placeholders, you can easily create customized formats by changing the default html and placeholders. With conditional placeholders, you can also show and hide certain information depending on whether a certain condition is true, e.g. if an event has bookings, you would want to show some more event information.
It may be that you want to show events elsewhere, such as within your posts, pages, or sidebars. This is possible with widgets and shortcode.
Further Development
If you know PHP and are comfortable editing WordPress themes/plugins, there are more advanced ways of editing the looks of your events and website using template tags, template files and advanced php.
If you would like to further customize Events Manager event more on your blog or site, this is totally possible, as we use various ways to allow programmers to override EM and change the way it behaves and looks.
We recommend you check out the Advanced Usage page for a quick coder's overview of Events Manager, but this is still work in progress, the best place to dive right in is probably our series of tutorials for creating a full add-on for events manager