Zoom Meetings are Event Locations and are available once you have installed and set up the free Events Manager for Zoom add-on.
Creating/Editing Zoom Meeting Events
When creating an event, choose Zoom Meeting as your location type. A new meeting will be created for you when you save your event, which will inherit the name, date/time and description excerpt (with a link to your event page) of your event.
Additionally, you will see an option to show/hide advanced options. These options are exactly the same as the options you’ll find when creating meetings on Zoom itself. You can see all the options highlighted on their documentation, adding a meeting via the web.
Editing the event title, name and description, or any of the advanced zoom meeting options will automatically update your meeting.
Helpful meeting links
Once an event has been created (along with the corresponding zoom meeting), you will be provided with a few helpful links just above the advanced options for your meeting.
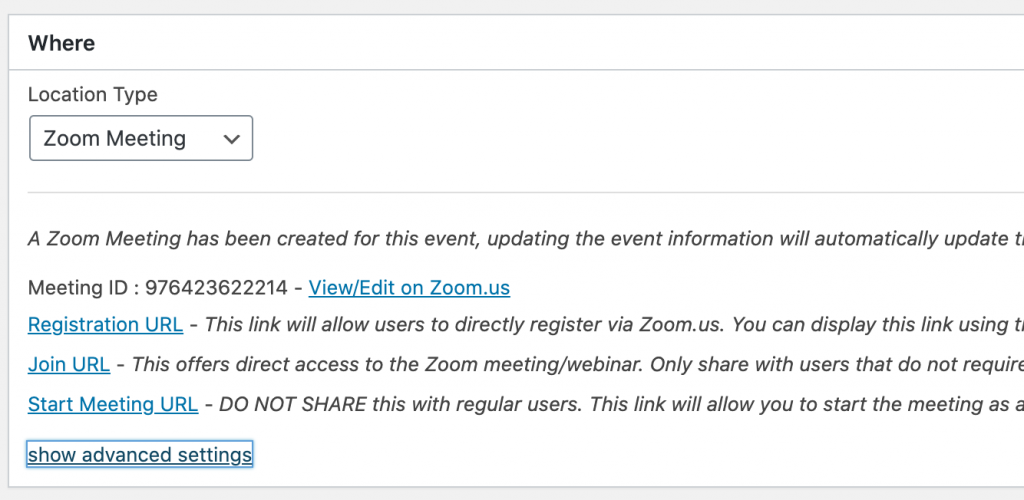
- Meeting ID – Useful when joining a meeting directly via the Zoom App.
- View/Edit link – View your meeting on the zoom.us admin area.
- Registration URL – A link to register, if registrations are enabled. See “Registrations and Bookings” further down for more information.
- Join URL – This is a universal Join URL which anyone can use to join the meeting directly. See “Registrations and Bookings” for more info.
- Start Meeting URL – A direct link to start for hosts only. Do not share this with anyone since they can start your meeting as a host instead of you.
Displaying Meeting Information
We have included some placeholders and conditional placeholders and search attributes to help you search and display your meeting information. We recommend wrapping placeholders in conditional placeholders so that non-Zoom Meeting events will not attempt to display it.
Conditional Placeholders
{has_event_location_zoom_meeting}…{/has_event_location_zoom_meeting}
Displays the … contents only if the event has a Zoom Meeting as the event location.
{no_event_location_zoom_meeting}…{/no_event_location_zoom_meeting}
Displays the … contents if the event specifically does NOT have a Zoom Meeting event location.
Placeholders
You can use the following bits of information with the following placeholders:
- #_EVENTLOCATION{id} – Meeting ID
- #_EVENTLOCATION{join_url} – Universal (not unique) Join URL
- #_EVENTLOCATION{password} – Password for entering the meeting.
- #_EVENTLOCATION{registration_url} – URL for registering to the meeting. Useful only if you do not want to use Events Manager for bookings and would like users to register directly on the Zoom website.
- #_EVENTLOCATION{start_url} – Link for meeting host to start the meeting. Warning! Use wisely, anyone with this link can start the meeting as the host, for safety reasons this link will be set to # if the user viewing it cannot manage the event in question (i.e. the owner or an events admin).
Filtering Zoom Meeting events
The location_type search attribute will support the value zoom_meeting for filtering events with Zoom Meetings. For example:
[events_list location_type=”zoom_meeting”]
Meeting Registration Types
Events Manager provides a flexible layer of access control on top of Zoom so that users can potentially book directly via Events Manager and automatically have a registration created for the meeting.
Zoom Meetings allow 3 types of access levels.
- Open meeting – Users can simply join the meeting without a required invitation.
- Registered users without approval – A registration form must be filled on Zoom.us, then they can join the meeting automatically via a link sent by email.
- Registered users with approval – After filling the registration form, meeting admins must approve the registrant before they receive a meeting join link by email.
All meeting types can add a couple of additional access security layers, such as passwords, requiring a zoom.us account and restriction to specific email domains (for companies), all of which can be configured within the advanced meeting settings whilst editing an event.
You can choose the access level to your meeting by clicking the show advanced options link in your Zoom Meeting settings and scrolling down to the Registration section.

Open Meetings (No registration required)
Open meetings do not require registration. If you want an open meeting, you can disable bookings for your event. Open meetings will not sync bookings made on Events Manager and vice-versa.
By selecting No registration required your visitors would not need to sign up for the event, they can simply join with a link. There is a single join link in this case that anyone with the link can use to join the event.
This join link is available on your event edit page (see further up) or can be displayed via the #_EVENTLOCATION{join_url} placeholder.
It is still possible to enable registrations on your site, however you should include the join URL and password (if set) via the booking confirmation emails.
Registered Meetings (with or without approval)
Events Manager essentially treats registration with or without approval the same way, and will only create a pre-approved registration on Zoom once a booking is approved on Events Manager. Bookings made on Zoom directly will not sync with Events Manager bookings.
We recommend you keep registrations with approval required, this means that if your registration link directly on zoom.us is somehow obtained, any bookings made there will remain pending.
Since bookings will only result in a Zoom registration when a regular booking is approved, you can add all the functionality of Events Manager into your bookings process, which we’ll cover in the Bookings section further down.
“Open” Registration Meetings
A third option with Events Manager is enabling registration for Zoom Meetings (with or without approval), and simply directly linking to the registration form on zoom.us. In this case, you can disable bookings for the event itself and link users directly to the Zoom registration form, bypassing booking via Events Manager.
Bookings via Events Manager
Letting Events Manager handle bookings to your meetings is where the possibilities open up, since you are able to do many more things within the booking process.
The main highlights are:
- Enable payments for meetings and webinars
- Automatic syncing of bookings (EM to Zoom)
- Add custom questions via your booking form
- Multiple attendees in one event booking with our Attendee Forms
- Book many events (with/out multiple attendees) at once with Multiple Bookings Mode
How it works
When you set a Zoom Meeting or Webinar as your event location, bookings made via Events Manager will automatically create a registration in Zoom once the booking has been approved. If a booking requires approval a registration is not immediately created until it is approved.
By default, a booking will create a single Zoom registration belonging to the email and name of the user that made the booking, see further down for custom questions which can also be supplied to the Zoom registrant details. If you want each space booked to have their own meeting invitation, see the Attendees section further down.
Important Note: Zoom does not have a way of preventing registrations from being made on its own site, so therefore anyone with a link to the Zoom Registration form can potentially book your event, bypassing Events Manager. Therefore, we strongly recommend you NOT display registration links if you want people to book via Events Manager, and additionally keep approval enabled on Zoom, just in case, since any non-EM registrations would still require manual approval.
Enabling payments
Since payments are handled by Events Manager before a booking is approved, there is no difference between having a regular paid event or a Zoom paid event if booking via Events Manager.
All you need to do here is ensure you’ve correctly set up a payment gateway, which you may have already done. Once payment is made and the booking is approved, only then will the Zoom registration occur.
Registering multiple attendees
If you would like to register an invitation for each space booked within a single booking, you will need to create a custom attendee form with the correctly named field IDs. If when making a booking, the attendee forms do not have these correct field names, it will revert to creating one registration to the Zoom Meeting/Webinar in the name/email of the person who made the booking.
We have made this easy to do with a single click, which will create a new attendee form containing all the standard Zoom questions.
Once you have connected Events Manager with your Zoom account, you will see a link to create an attendee form template in your EM Zoom settings page:

Clicking this will create a new attendee form called Zoom Attendee. The minimum required fields here are Email, First Name and Last Name.
See the ‘Custom booking form questions’ below for information about customizing your booking forms.
Once you have your attendee form, remember to assign it as your attendee form when creating a Zoom meeting/webinar event.
You can also modify any of the fields as needed (including name and email field), provided you maintain the same Field ID. Note that any additional field which does not have the standard Field ID as provided in the template will be treated as a custom question).
Custom booking form questions
For regular booking forms, you can add the same fields as the attendee fields, apart from name/email which is automatically obtained by the user WordPress account (or no-user details).
Additionally, if you have mapped user fields in the “Common User Fields for Gateways“, these will be also used to populate standard Zoom question fields, and do not need to use the same ID as attendee form fields.
We suggest creating a custom attendee form and copying over any fields you’d like to use.
Any other “non-standard” fields with a different ID to these fields will be treated as a custom question.
Displaying invitation information
Since Zoom registrations are created when a booking is approved, we suggest including Zoom Meeting/Webinar information in the confirmation email. Aside from the regular placeholders further up, you can also use the
#_BOOKINGZOOMJOINLINK or #_BOOKINGZOOMJOINURL
Placeholder to generate a unique URL for each attendee. Currently, via Events Manager, an email is only sent to the person who made the booking. However, you can also enable email confirmations to be sent directly from Zoom via your meeting/webinar settings when editing an event, which would also email each attendee separately.
Multiple Bookings Mode
If you would like a user to make multiple bookings to different events, and then pay or confirm via a checkout flow, you can use our Multiple Bookings Mode feature, which will automatically create Zoom registrations for each event.
This will work much the same way as if the event was booked separately on its own, and each event has its own settings, such as custom attendee/booking forms and meeting/webinar settings.