Attendee forms can be created the same way other custom booking forms are created, and are available via your settings page.
When activated, the Attendee Form will be shown for every space booked. Because the Attendee Form isn’t activated by default, the first step is to go to Events > Form Editor > Attendee Form, and set Enable Attendee Forms to Yes and click Save.
Once the page has refreshed, you’ll see the Attendee Form tab now looks this:
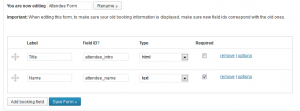
To create your first form, type a name for it in the text box and click the Add New button. This will generate the default form, which looks like this:
The default Attendee Form only asks the user for a Title and Name, so you may well want to add fields to it or to create a completely customized version. See the custom booking forms documentation page for more information on creating new fields in your Form Editor.
Tip: You’ll notice that the first field is an HTML field, containing the text ‘Attendee #NUM#’. When displayed in booking forms, #NUM# gets replaced by a number depending on how many forms are shown. So, if you choose 3 spaces, the third space will have a heading of Attendee 3.

