By setting Events Manager to run in PayPal Sandbox / Test mode, you can extensively test the gateway without needing worry about having to keep refunding test payments.
In Sandbox mode, the PayPal gateway functions exactly the same as in Live Mode except transactions do not involve real money.
To run sandbox mode you’ll need a developer account from https://developer.paypal.com. If you already have a PayPal account you should be able to login with your normal username and password.
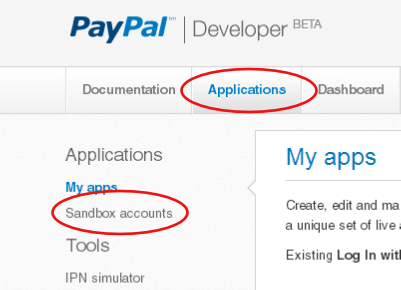
Once logged in, go to Applications > My Apps > Sandbox Accounts.
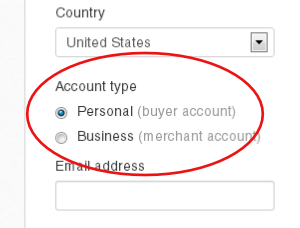
On the Create test account screen, you’ll be asked to fill in the information used to populate your test account. As well as an email address and password, you can choose things like whether the test account should be treated as a verified account and decide how “money” should be in the account balance.
You’ll also be asked to choose the type of account – Personal or Business.
To fully test the Events Manager PayPal Gateway, you’ll need to create both a Personal and Business account. This will allow you to test transactions are working correctly from both the customer and merchant point-of-view.
Logging in to your Sandbox accounts
Even though sandbox accounts are created through the Developer website, you need to login via the Sandbox site below to check payments and transactions and make other changes. This applies to both your business and personal sandbox accounts.
After you’ve created the accounts via the Developer site, Sandbox accounts are accessible at https://www.sandbox.paypal.com.
Before you can begin testing, login into the PayPal Sandbox site using your test business account and set it up to receive payments exactly as if it were a live account.
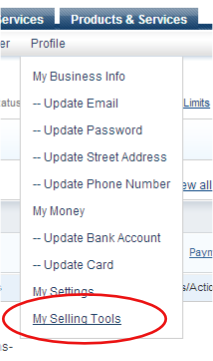
To do this, choose Profile > My Selling Tools.
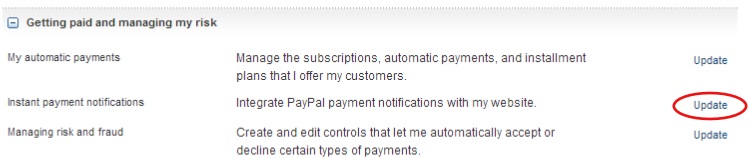
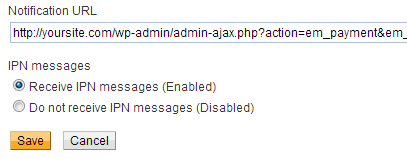
On the next page, scroll down to Instant payment notifications and click Update.
On the next screen, click Choose IPN Settings.
Under Notification URL, paste in the IPN return url that you’ll find in Events Manager under Events > Payment Gateways > PayPal > PayPal Options.
Make sure Receive IPN messages is checked and click Save.
Setting a return URL
In most cases, you’ll want to bring users back to your site automatically after the transaction. To set where users are sent, go to Profile > Selling Tools again and click Update next to Website preferences.
On the next screen set Auto Return to on and Return URL to the page you want users to be taken back to. Note: When a Return URL is set but Auto Return is off, users will see a PayPal thank you page with a manual link to the return url.
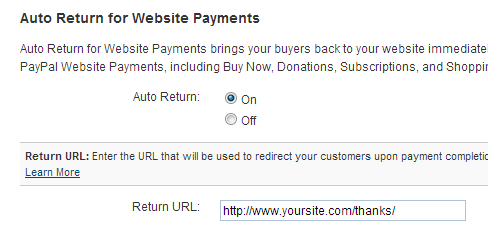
Important: Although you can redirect to any page on your site, PayPal requires that the page makes it clear to users that the payment has been made and the transaction is complete.
When you’re done, remember to logout of this account so that you can test the Events Manager payment gateway using your personal sandbox account later.
Setting Up PayPal Sandbox Mode in Events Manager
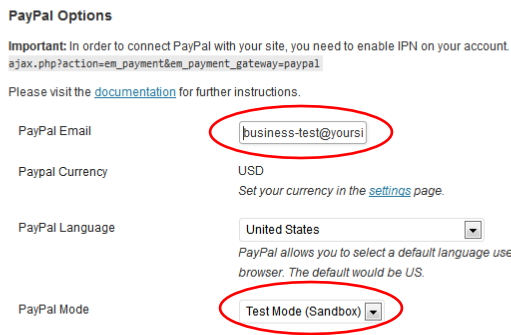
In Events Manager, go to Events > Payment Gateways > PayPal. Under PayPal Options, set PayPal Email to the email address of your business sandbox account.
You’ll also need to change PayPal Mode underneath to Test Mode (Sandbox).
Now you’re ready to a make a test payment through an event page on your site by using the email address of your personal sandbox account.
IMPORTANT
Once you’ve finished testing, don’t forget to go back to Events > Payment Gateways > PayPal and set the PayPal Email to the correct email address for live transactions and to switch Sandbox mode back to Live mode.