While standard Authorize.net accounts can be run in Test Mode, that’s not practical if the account is being used to process live transactions. Instead, you’ll probably want to use a separate sandbox account for testing. If you’re a web developer this has the added bonus of not requiring your clients to send you their live Authorize.net login info.
The first step is to go to the developer.authorize.net and sign up for an account.
You’ll immediately be given an API Login ID, Transaction Key and Secret Question. Make note of those, head over to the sandbox testing environment at sandbox.authorize.net and sign in with your developer username and password (not your API login info).
Inside you’ll see it looks exactly like a live Authorize.net admin panel. Everything works the same, the only difference is that credit card numbers passing through sandbox accounts are never charged. If you’d prefer to test with dummy info, there are number of test credit card numbers you can use (you should receive an email with these when registering for the sandbox) – check the Authorize.net Testing FAQ for more info.
Setting up Events Manager for Sandbox Testing
Go to Events > Payment Gateways and set Authorize.net to Active (if you haven’t already done so). Then click Settings under Authorize.net. On the settings page, set Mode to Sandbox.
Then, as you would when setting up a normal Authorize.net account, and add your Transaction key, API Login ID, MD5 Hash and User Login ID.
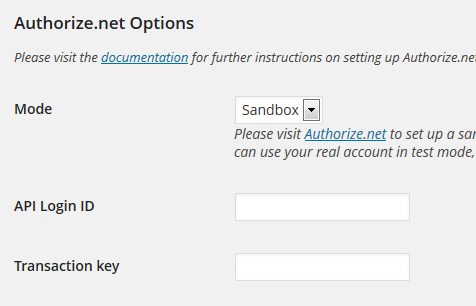
Note: Your User Login ID is the login you use to access the sandbox.
If you need help with any of these settings, take a look at our main tutorial on using Authorize.net with Events Manager.
At this point you should see an option to take payments on your site via Authorize.net when you visit a booking / checkout page.
If you don’t see the button, make sure that Enable Quick Pay Buttons is set to No under Events > Settings > Payment Gateway Options.
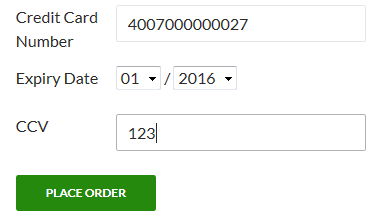
Add some credit card info to the payment form and click the Place Order button. If you’re using one of the test credit card numbers supplied by Authorize.net (as in the screenshot below) you can make the expiration any date in the future and choose any three figure number as the CCV.
After you see a successful booking notice on your site, the transaction should appear under the Reports section of your sandbox account, as well as the Events > Bookings section of Events Manager with the gateway listed as authorize_aim.
Once you’ve finished testing using the sandbox, go back to Events > Payment Gateways > Authorize.net and switch Mode from Sandbox to Live and swap the Transaction key, API Login ID, MD5 Hash and User Login ID to those of the live Authorize.net account.